Hipchat Ssl Do You Want to Trust the Host and Continue
DevOps / Sys Admin Q & A #11 : SSH & SSL(TLS)
![]()
bogotobogo.com site search:
Prelude
To get the most out of this post, we need to understand two important concepts: public key cryptography and signature.
- Public key cryptography - encrypt/decrypt:
Any message encrypted with Bob's public key can only be decrypted with Bob's private key.
=>
Bob can decrypt a message from a remote server using his private key if the message is encrypted with his public key.
- Digital cert with signature:
Anyone who has Alice's public key can verify a signature (message) is indeed from Alice (created with her private key) not from anyone else.
=>
Our browser can verify the ssl cert issued by CA and sent by Alice's server is indeed from the her server. This is because when the server gets a page request, it sends both of its certs and public key.
Anyone who has Alice's public key can verify that a signature could only have been created by someone with an access to Alice's private key.
Introduction - Asymmetric (Public) key
One effective way of securing SSH access to a remote server is to use a public/private key pair. This means that a public key is placed on the server and a private key is placed on our local workstation authenticating each side to the other, and passing commands and output back and forth.
In short, SSH allows remote login and other network services to operate securely over an unsecured network.
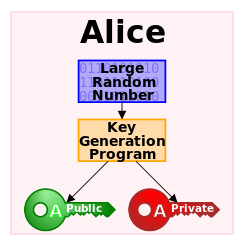
Picture source : ref #4 - An unpredictable (typically large and random) number is used to begin generation of an acceptable pair of keys suitable for use by an asymmetric key algorithm.
Note: Symmetrical (shared key) encryption is a type of encryption where one key can be used to encrypt messages to the opposite party, and also to decrypt the messages received from the other participant. So, anyone who holds the key can encrypt and decrypt messages to anyone else holding the key.
The server listens on a designated port (22) for connections. It is responsible for negotiating the secure connection, authenticating the connecting party, and spawning the correct environment if the credentials are accepted.
The client is responsible for beginning the initial TCP handshake with the server, negotiating the secure connection, verifying that the server's identity matches previously recorded information, and providing credentials to authenticate.
SSH Workflow
The SSH connection between the client and the server is established in three stages:
- Verification of the server by the client.
- Generation of a session key to encrypt the communications between the server and the client.
- Client authentication.
Let's look into the three stages one by one.
- Verification of the server by the client:
The client initiates a SSH connection. Server listens to SSH's default port 22. At this stage, the server identity is verified. There are two cases:
- The first time: when the client accesses the server for the first time, the server asks the client to verify the server manually:
$ ssh -i bogotobogo.pem ubuntu@3.236.66.255 The authenticity of host '3.236.66.255 (3.236.66.255)' can't be established. ECDSA key fingerprint is SHA256:kPVPFoAzH927+HMenDk81UFRMPNY2/KAYYvVFN/dTi8. Are you sure you want to continue connecting (yes/no)? yes Warning: Permanently added '3.236.66.255' (ECDSA) to the list of known hosts. Welcome to Ubuntu 18.04.4 LTS (GNU/Linux 5.3.0-1023-aws x86_64) ... ubuntu@ip-172-31-94-245:~$ ubuntu@ip-172-31-94-245:~$ cat ~/.ssh/authorized_keys ssh-rsa AAAAB3NzaC1yc2EAAAADAQABAAABAQCXQumwl....
Once the server is verified, it will be added to ~/.ssh/known_hosts file on the client side.
- After the first time: next time the client tries to access the server, the verification is done by cross-checking with the information stored in the ~/.ssh/known_hosts file:
$ cat ~/.ssh/known_hosts ... 100.26.243.180 ecdsa-sha2-nistp256 AAAAE2VjZHNhLXNoYTItbmlzdHAyNTYAAAAIbmlzdHAyNTYAAABBBOLSFx0UX5sWlpXaf/4VBxyWYaiovjbJq2nscrBIUngJjz3gwtummz1X01Yjn6DIJEm+Ak+I4yEn3sJHhVGV5eg= ...If we remove the line of the server from the ~/.ssh/known_hosts file, we need to go back and take the step 1 process again.
- The first time: when the client accesses the server for the first time, the server asks the client to verify the server manually:
- Generation of a session key to encrypt the communications between the server and the client:
After the server is verified, both sides negotiate a session key which is a shared (identical) symmetric key generated from the Diffie-Hellman algorithm.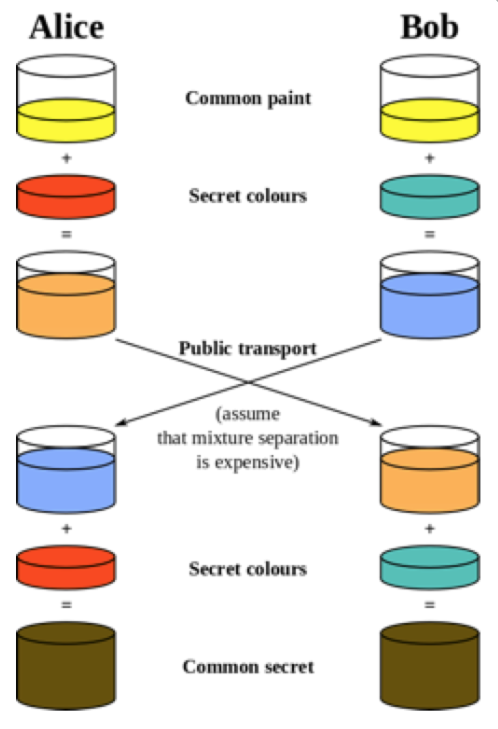
Picture source: Diffie–Hellman key exchange
This session key will be used to encrypt the entire session. - Client authentication:
Once the symmetric encryption has been established, the next stage is to authenticating the client.
Simply put, the processes look like this:
- Generate a key pair with
ssh-keygen. - Give the server the public key with
ssh-copy-idutility. The private key stays with the user. - The server stores the public key as ~/.ssh/authorized_keys. If the server does not have the public key, the client gets permission denied, for example:
- Later, anytime the server wants to authenticate, the server asks the client to prove that it has the private key that corresponding to the public key. Actually, the server generates a random number and uses the public key to encrypt the number and sends this encrypted message.
- Client proves it has the private key.
- How to prove?
If the client has the correct private key, it can decrypt the message to obtain the random number that was generated by the server. The client combines the obtained random number with the shared session key and calculates the MD5 hash of this value. The client then sends this MD5 hash back to the server as an answer to the encrypted number message.
The server uses the same shared session key and the original number that it sent to the client to calculate the MD5 value on its own. The server compares its own calculation to the one that the client sent back. If these two values match, the client is authenticated.
$ ssh -i bogotobogo.pem ubuntu@3.236.66.255 ubuntu@3.236.66.255: Permission denied (publickey).
Here is a sample
sshwith verbose option:~/.ssh $ ssh -v -i bogotobogo.pem ubuntu@3.236.66.255 OpenSSH_7.6p1, LibreSSL 2.6.2 debug1: Reading configuration data /etc/ssh/ssh_config debug1: /etc/ssh/ssh_config line 48: Applying options for * debug1: Connecting to 3.236.66.255 port 22. debug1: Connection established. debug1: key_load_public: No such file or directory debug1: identity file bogotobogo.pem type -1 debug1: key_load_public: No such file or directory debug1: identity file bogotobogo.pem-cert type -1 debug1: Local version string SSH-2.0-OpenSSH_7.6 debug1: Remote protocol version 2.0, remote software version OpenSSH_7.6p1 Ubuntu-4ubuntu0.3 debug1: match: OpenSSH_7.6p1 Ubuntu-4ubuntu0.3 pat OpenSSH* compat 0x04000000 debug1: Authenticating to 3.236.66.255:22 as 'ubuntu' debug1: SSH2_MSG_KEXINIT sent debug1: SSH2_MSG_KEXINIT received debug1: kex: algorithm: curve25519-sha256 debug1: kex: host key algorithm: ecdsa-sha2-nistp256 debug1: kex: server->client cipher: chacha20-poly1305@openssh.com MAC:
compression: none debug1: kex: client->server cipher: chacha20-poly1305@openssh.com MAC: compression: none debug1: expecting SSH2_MSG_KEX_ECDH_REPLY debug1: Server host key: ecdsa-sha2-nistp256 SHA256:kPVPFoAzH927+HMenDk81UFRMPNY2/KAYYvVFN/dTi8 debug1: Host '3.236.66.255' is known and matches the ECDSA host key. debug1: Found key in /Users/kihyuckhong/.ssh/known_hosts:15 debug1: rekey after 134217728 blocks debug1: SSH2_MSG_NEWKEYS sent debug1: expecting SSH2_MSG_NEWKEYS debug1: SSH2_MSG_NEWKEYS received debug1: rekey after 134217728 blocks debug1: SSH2_MSG_EXT_INFO received debug1: kex_input_ext_info: server-sig-algs= - Generate a key pair with
How SSL works
Secure Socket Layer (SSL) also known as Transport Layer Security (TLS).
The following protocols are most commonly used:
- SSL 1.0 (not published)
- SSL 2.0 (1995)
- SSL 3.0 (1996), broken by POODLE (Nov 2014)
- TLS 1.0 (SSL 3.1) (1999), minor tweak to SSLv3, weakened by BEAST(2011) and Lucky 13(2013)
- TLS 1.1 (SSL 3.2) (2006), minor tweak, weakened by Lucky 13 (2013) and RC4(2013, 2015)
- TLS 1.2 (SSL 3.3) (2008), improved hashes and AEAD mode, only safe with AEAD mode ciphers
- TLS 1.3 (2018)
Just watching the following video (ref. #5), we can get a high level of idea about how SSL (Secure Socket Layer) works!
No one video is complete and the following three may help us to understand SSL.
The ref.#7 is a relatively thorough document regarding the SSL handshake!
SSL-Handshake
Key concepts:
- Public key cryptocraphy: Any message encrypted with Bob's public key can only be decrypted with Bob's private key => Bob can decrypt a message from a remote server using his private key if the message is encrypted with his public key.
- Digital cert with signature: Anyone who has Alice's public key can verify a signature (message) is indeed from Alice (created with her private key) not from anyone else => Our browser can verify the ssl cert issued by CA and sent by Alice's server is indeed from the her server. This is because when the server gets a page request, it sends both of its certs and public key.
Why digital certificate?
Once a TCP/IP connection has been established between the client and the server, the client will now forward the requests to the Destination IP on port 443 (Default TLS/SSL port). The control is now transferred to the SSL Protocol in the application layer.
Note that though the client has the IP & the Port information handy from TCP handshake, it still has no clue whatsoever about the hostname.
Basically, 3 keys are used to set up the SSL connection: the public, private, and session keys.
Because encrypting and decrypting with private and public key takes a lot of processing power, they are only used during the SSL Handshake to create a symmetric session key . After the secure connection is made, the symmetric session key is used to encrypt all transmitted data.
The SSL transaction has two phases:
- SSL Handshake (the key exchange)
- SSL data transfer
Pic. credit : SSL Handshake and HTTPS Bindings on IIS
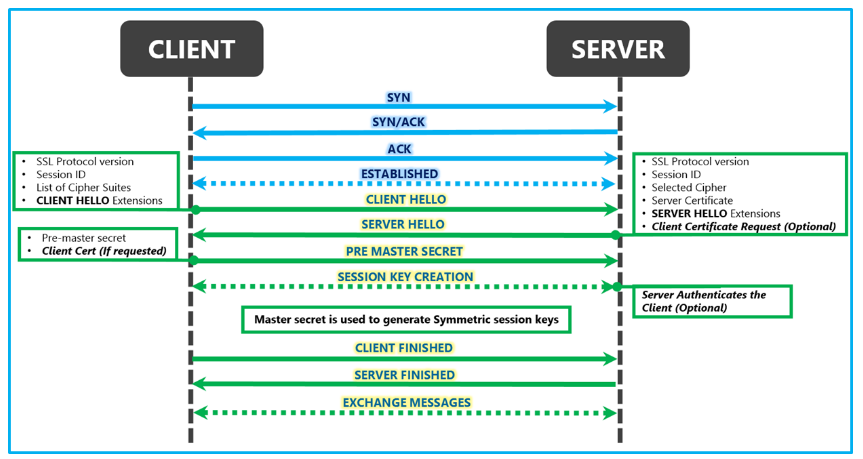
Here are the steps of SSL/TLS handshake:
- The client creates/sends a TLS Packet called as CLIENT HELLO which contains the following details: SSL/TLS Protocol version, list of Cipher Suites and a string of random bytes known as the "client random."
- The Server responds to the client with SERVER HELLO which contains the following: SSL/TLS Protocol version, one of the cipher suites from the list of cipher suites (whichever is the most secure) provided by the client, Certificate of the server (including its public key ), and the "server random," another random string of bytes that's generated by the server.
- The Client uses the SERVER HELLO to perform SERVER AUTHENTICATION.
- The Client uses the data provided from the server to generate a pre-master secret for the session, encrypts it with the server's public key (obtained from the server's certificate), and then sends the encrypted pre-master secret to the server. ( asymmetric key).
- The server uses its private key to decrypt the pre-master secret, and then performs a series of steps (which the client also performs, starting from the same pre-master secret) to generate a master secret. Both the client and the server use the master secret to generate a session keys , which are symmetric keys used to encrypt and decrypt information exchanged during the SSL session and to verify its integrity (that is, to detect any changes in the data between the time it was sent and the time it is received over the SSL connection).
- The CLIENT & the SERVER send each other a message informing that future messages from them will be encrypted with the session keys. It then sends a separate (encrypted) message indicating that its portion of the handshake is finished. The SSL Handshake is done.
- From now on, the Client sends the actual HTTP Request packet to the Server in the encrypted form. The Server decrypts the request via the symmetric key and generates a response, encrypts it and sends it back to the client. This continues normally for the entire session of secure communication.
In summary, the server itself sends a public key , and the client and server establish a shared secret that they can use to encrypt the communication. So, all the communication between the visitor and the server is encrypted with a symmetric key, meaning both parties have the same key.
ref: SSL/TLS handshake Protocol
Cipher suites
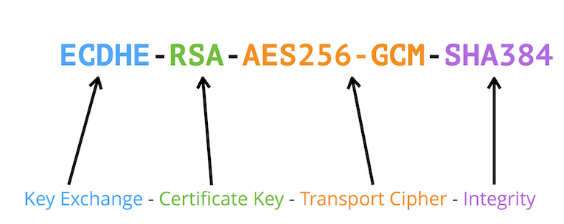
Essentially, the first term is the Key Exchange, an algorithm that the two parties use to exchange keys. In this case, it's based on the Diffie-Hellman algorithm, specifically, Elliptic-Curve Diffie–Hellman (ECDHE).
The second term is what type of key is in our Certificate. So every certificate has a public key of a certain type, Public Key Infrastructure (PKI) certifacate. In this case it's RSA.
The third piece is our Transport Cipher, the encryption algorithm used to encrypt all the data. There's a lot of different pieces that go into this, but AES with Galois/Counter Mode (AES‑GCM) is the most secure cipher. This is a pretty cheap and solid cipher to use.
The last one is Integrity with Secure Hash Algorithms (SHA) with one of SHA-2 family. The SHA384 produces the 384 bit digest of a message. Messages have a cache that goes along with them to make sure they haven't been tampered but if it's encrypted, and with integrity, we can go from there.
Digital Signature
Digital signatures, like handwritten signatures, are unique to each signer. Digital signature uses Public Key Infrastructure (PKI).
A digital signature of a document is typically nothing else than a hash of the document encrypted with the signer's private key . If this signature can be decrypted with the signer's public key, then we know that the signature must have been made by this signer, because this signer is the only one that has access to this private key.
When a signer signs a document electronically using the signer's private key, the mathematical algorithm creates hash applying the document, and encrypts that data. The resulting encrypted data is the digital signature. The signature is also marked with the time that the document was signed. If the document changes after signing, the digital signature is invalidated.
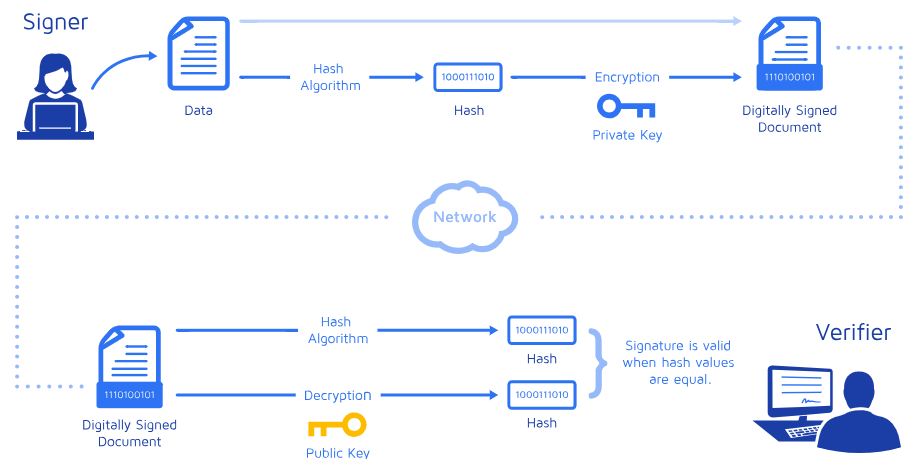
Picture from What are digital signatures?
Here is a sample case:
- Alice clicks 'sign' a file.
- Alice's computer calculates the 'hash' (the message is applied to a publicly known mathematical hashing function that coverts the message into a hash).
- The hash is encrypted with Alice's Private Key to create the Digital Signature.
- The original message and its Digital Signature are sent to Bob.
- Bob receives the signed message. It is identified as being signed, so his application knows which actions need to be performed to verify it.
- Bob's computer decrypts the Digital Signature using Alice's Public Key.
- Bob's computer also calculates the hash of the original message.
- Bob's computer compares the hashes it has computed from the received message with the now decrypted hash received with Alice's message.
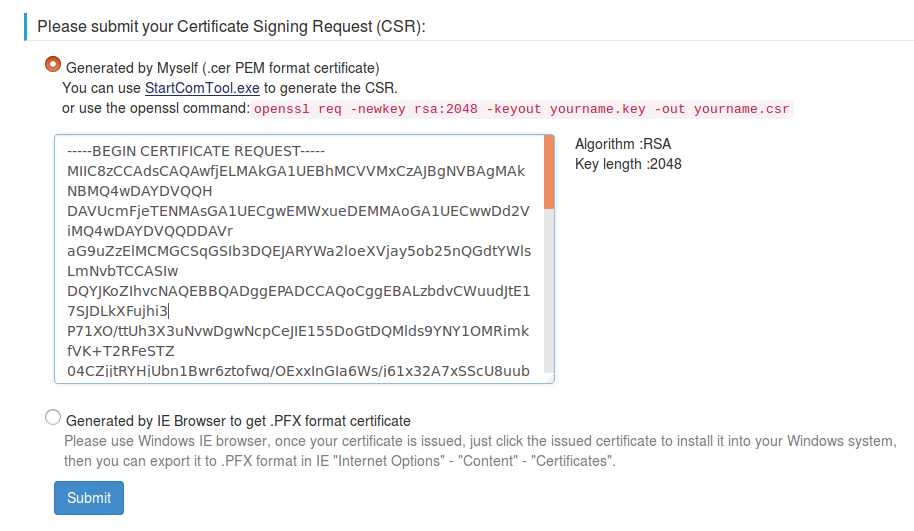
CSR?
Steps to Request and Install SSL Certificate:
- Generate a CSR and key pair locally on our server. The key pair consists of a public and private key (we can find the embedded public key in *.csr) :
$ openssl req -new -newkey rsa:2048 -nodes -keyout bogo-privatekey.key -out bogo.csr Generating a 2048 bit RSA private key ...........................................................+++ ............................................................+++ writing new private key to 'bogo-privatekey.key' ... $ ls bogo-privatekey.key bogo.csr $ cat bogo-privatekey.key -----BEGIN PRIVATE KEY----- MIIEvQIBADANBgkqhkiG9w0BAQEFAASCBKcwggSjAgEAAoIBAQDU5OXoQLIjCKIM ... tggWYqo+TH2fRTop5XSwUnLozDxvhmxUdlhBTDK4IYVV6XXRl8tWxwUgf4z7AerK pH4X+Yh23ug9/gRAFG5npgk= -----END PRIVATE KEY----- $ cat bogo.csr -----BEGIN CERTIFICATE REQUEST----- MIICzDCCAbQCAQAwgYYxCzAJBgNVBAYTAlVTMQswCQYDVQQIDAJDQTERMA8GA1UE ... sAtrDA6L8ToOaT4aUT+NpTfj/X/hx9bhpB+jo49hcJ+n4bXERhggHjyMQ1lkQLWI -----END CERTIFICATE REQUEST-----
We can easily decode the CSR on our server using the following OpenSSL command:
$ openssl req -in bogo.csr -noout -text Certificate Request: Data: Version: 0 (0x0) Subject: C=US, ST=CA, L=San Jose, O=bogotobogo, CN=www.bogotobogo.com/emailAddress=kihyuck.hong@gmail.com Subject Public Key Info: Public Key Algorithm: rsaEncryption Public-Key: (2048 bit) Modulus: 00:d4:e4:e5:e8:40:b2:23:08:a2:0c:21:3e:ee:ba: a0:17:af:a1:7c:10:51:4a:41:c0:c1:0d:84:1a:0b: ... 8a:a9:34:cf:46:ff:2d:40:8a:69:f3:41:e5:cc:9c: 6c:78:f1:92:30:83:44:f7:c8:b7:4c:4e:73:00:c3: b7:d3 Exponent: 65537 (0x10001) Attributes: a0:00 Signature Algorithm: sha256WithRSAEncryption 49:06:2f:38:67:87:a8:c3:23:96:92:a1:49:9c:65:8b:02:82: 8f:f7:9a:1f:63:ac:b1:64:17:ae:1b:55:33:8e:7a:32:78:92: ... 0e:69:3e:1a:51:3f:8d:a5:37:e3:fd:7f:e1:c7:d6:e1:a4:1f: a3:a3:8f:61:70:9f:a7:e1:b5:c4:46:18:20:1e:3c:8c:43:59: 64:40:b5:88 Start Time: 1625171760 Timeout : 7200 (sec) Verify return code: 0 (ok) --- - Send the CSR and public key to a CA who will verify the legal identity and whether we own the domain submitted in the application. The Certificate Authority runs a check on our organization and validates if the organization is registered at the location provided in the CSR and whether the domain exists.
- When verified, the organization receives a copy of their SSL certificate including business details as well as the public key. The organization can now install the certificate on their server.
- When a CA issues the certificate, it binds to a certificate authority's "trusted root" certificate. Root certificates are embedded into each browser and connected to individually issued certificates to establish an HTTPS connection.
Certificate chains
A certificate chain is an ordered list of certificates, containing an SSL Certificate and Certificate Authority (CA) Certificates, that enable the receiver to verify that the sender and all CA's are trustworthy. The chain or path begins with the SSL certificate, and each certificate in the chain is signed by the entity identified by the next certificate in the chain.
Any certificate that sits between the SSL Certificate and the Root Certificate is called a chain or Intermediate Certificate. The Intermediate Certificate is the signer/issuer of the SSL Certificate. The Root CA Certificate is the signer/issuer of the Intermediate Certificate. If the Intermediate Certificate is not installed on the server (where the SSL certificate is installed) it may prevent some browsers, mobile devices, applications, etc. from trusting the SSL certificate. In order to make the SSL certificate compatible with all clients, it is necessary that the Intermediate Certificate be installed.
The below figure illustrates a certification path from the certificate owner to the Root CA, where the chain of trust begins:
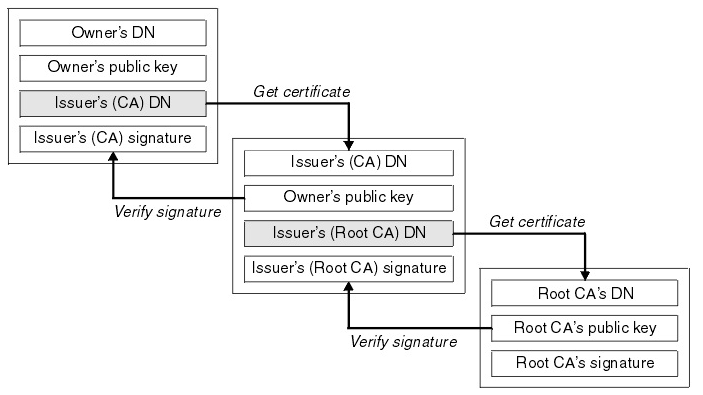
Picture from How certificate chains work
List of Certificate Authorities (CA):
| Rank | Issuer | Usage | Market share |
|---|---|---|---|
| 1 | IdenTrust | 38.0% | 51.2% |
| 2 | DigiCert | 14.6% | 19.7% |
| 3 | Sectigo | 13.1% | 17.7% |
| 4 | GoDaddy | 5.1% | 6.9% |
| 5 | GlobalSign | 2.2% | 3.0% |
| 6 | Certum | 0.4% | 0.7% |
| 7 | Actalis | 0.2% | 0.3% |
| 8 | Entrust | 0.2% | 0.3% |
| 9 | Secom | 0.1% | 0.3% |
| 10 | Let's Encrypt | 0.1% | 0.2% |
| 11 | Trustwave | 0.1% | 0.1% |
| 12 | WISeKey Group | < 0.1% | 0.1% |
| 13 | StartCom | < 0.1% | 0.1% |
| 14 | Network Solutions | < 0.1% | 0.1% |
Source: wiki: Certificate_authority
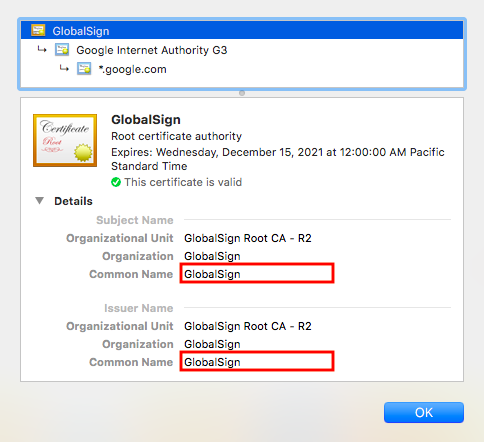
The chain terminates with a Root CA Certificate. The Root CA Certificate is always signed by the CA itself. The signatures of all certificates in the chain must be verified up to the Root CA Certificate.
We can see the Root CA Certificate was self-signed:
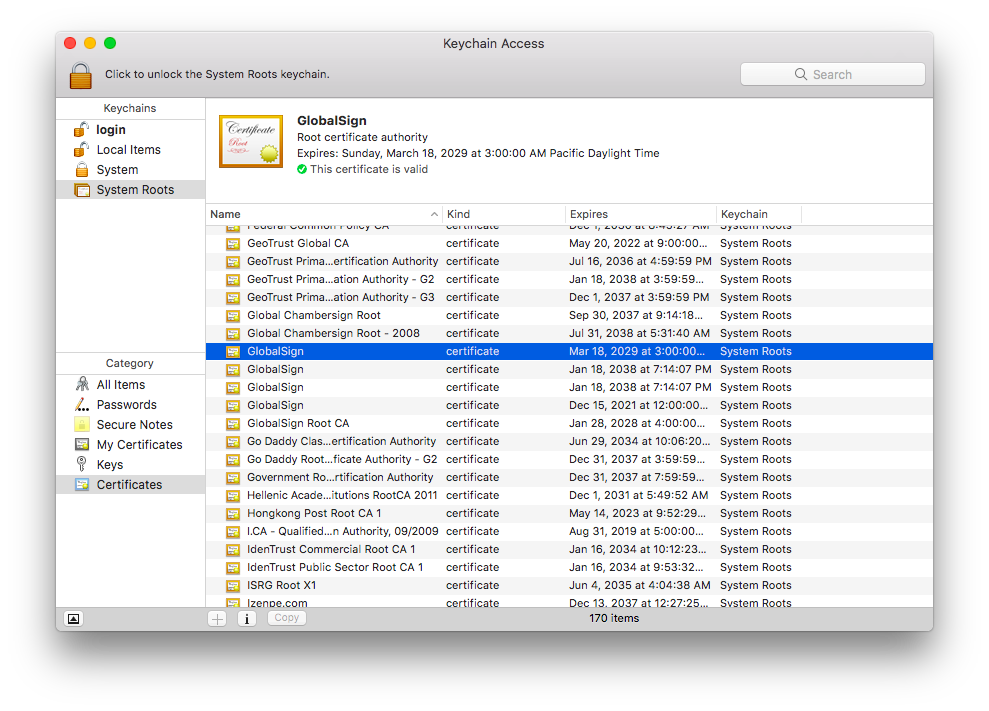
Here is a sample of a cert list on a Mac:
Getting a Free Certificate - Option 1
Let's Encrypt is a non-profit CA that issues certificate completely free of charge. Moreover, they use the Automatic Certificate Management Environment (ACME) protocol, which automates the identity verification and certificate issuing process.
We can get a certificate from Let's Encrypt via Certbot ACME client.
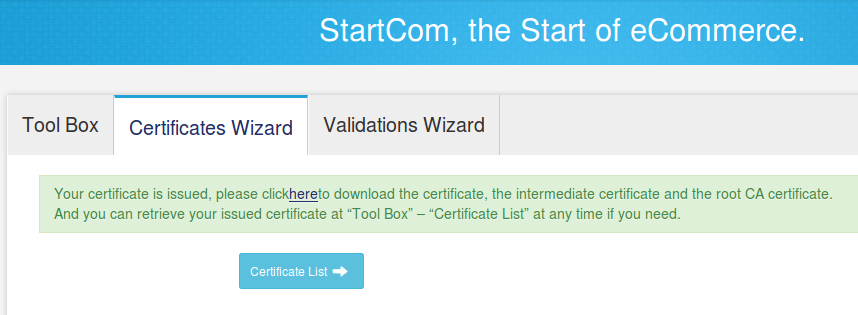
Getting a Free Certificate - Option 2
Let's start with https://www.startcomca.com/
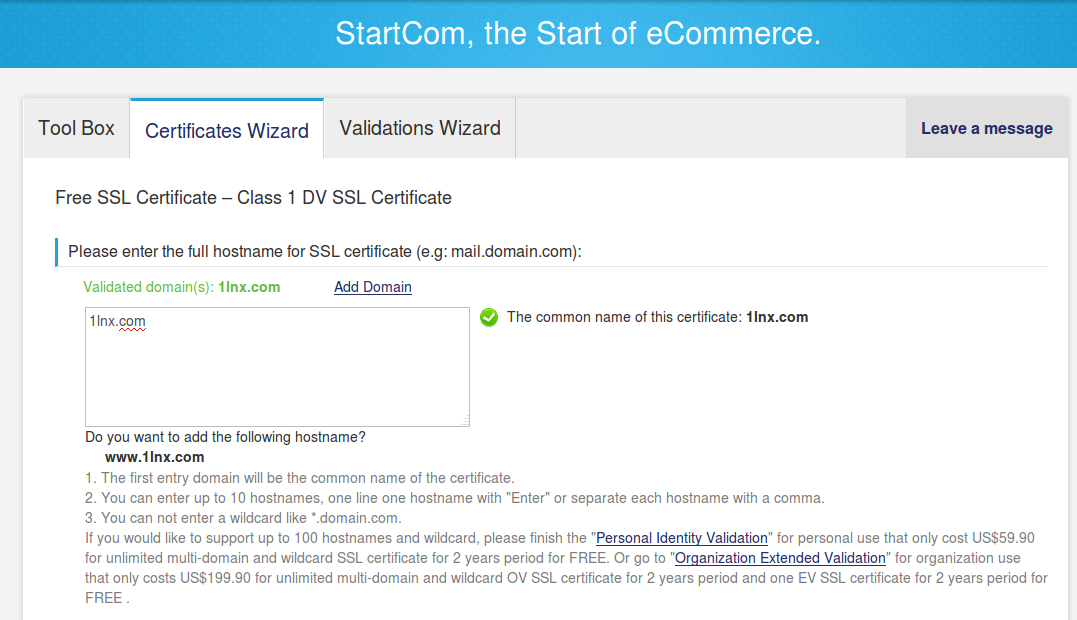
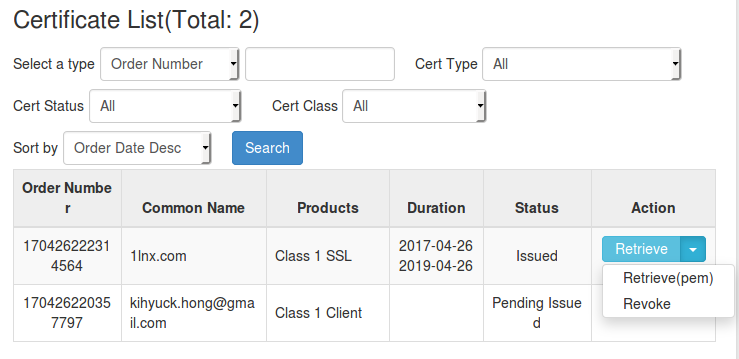
Retrieve the certificate (1lnx.com.pem).
Get a complete CA bundle in a zip file by clicking the item under SSL/TLS:
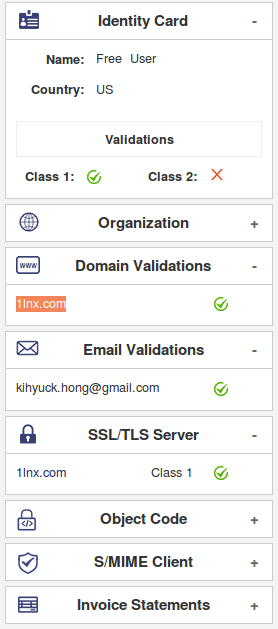
Unzip will give us the following certs for several servers:
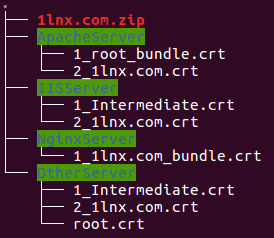
We'll use 1_1lnx.com_bundle.crt which is for Nginx. It is a bundle file that contains root and intermediate certificates.
nginx with SSL/TLS
To see how we use NGINX with SSL, please visit DevOps / Sys admin Q & A #26 : NGINX SSL, Caching, and Session.
TLS passthrough or termination at Proxy (Load Balancer)
Deciding whether the TLS hand shake should be done with a Proxy (termiantion / offloading) or actual backend server (passthrough) is tough and there are pros and cons.
The configuration of proxy SSL passthrough does not require the installation of a SSL certificate on the load balancer. SSL certificates are installed on the backend server because they handle the SSL connection instead of the load balancer.
From server's perspective, SSL passthrough is more costly because it uses more CPU for encryption. Proxy SSL passthrough does not inspect traffic or intercept SSL sessions on network devices before reaching the server since it just passes along encrypted data. SSL passthrough is better suited for smaller deployments.
SSL passthrough passes HTTPS traffic to a backend server without decrypting the traffic on the load balancer. The data passes through fully encrypted and the Proxy only sees socket (ip/port, layer 4) and does not perform any layer 7 actions.
SSL termination (or offloading ), decrypts all HTTPS traffic on the load balancer. Layer 7 actions are carried out and the data proceeds to the backend server as plain HTTP traffic. SSL offloading allows data to be inspected as it passes between the load balancer and server. It also reduces CPU demand on an application server by decrypting data in advance. SSL offloading is vulnerable to attack, however, as the data travels via HTTP and unencrypted between the load balancer and application server.
Checking connnections with openssl
My domain, sub.mydomain.com is running a syslog server behind an AWS NLB. A TLS cert from digicert CA is installed on the LB via ACM and TLS terminates there. Then regular TCP communications are setup between the NLB and backend server. The server is listening on port 6514.
openssl comes with a client tool that we can use to connect to a secure server. The tool is similar to telnet or nc in the sense that it handles the encryption aspect but allows us to fully control the layer that comes next.
$ openssl s_client -crlf -connect sub.mydomain.com:6514 CONNECTED(00000005) depth=2 C = US, O = DigiCert Inc, OU = www.digicert.com, CN = DigiCert Global Root CA verify return:1 depth=1 C = US, O = DigiCert Inc, CN = DigiCert TLS RSA SHA256 2020 CA1 verify return:1 depth=0 C = US, ST = California, L = Palo Alto, O = MyDomain Inc, CN = sub.mydomain.com verify return:1 --- Certificate chain 0 s:/C=US/ST=California/L=Palo Alto/O=Domain Inc/CN=sub.mydomain.com i:/C=US/O=DigiCert Inc/CN=DigiCert TLS RSA SHA256 2020 CA1 1 s:/C=US/O=DigiCert Inc/CN=DigiCert TLS RSA SHA256 2020 CA1 i:/C=US/O=DigiCert Inc/OU=www.digicert.com/CN=DigiCert Global Root CA --- Server certificate -----BEGIN CERTIFICATE----- MIIGvDCCBaSgAwIBAgIQDYxCSP63BxGeAsTWMZR8TDANBgkqhkiG9w0BAQsFADBP 5KHy8R1drsF27dO36ckzY3gXFMqJ21EJ5HuyESXbsI/pzCfEH77NjBfc4ZtjwOA9 -----END CERTIFICATE----- subject=/C=US/ST=California/L=Palo Alto/O=MyDomain Inc/CN=sub.mydomain.com issuer=/C=US/O=DigiCert Inc/CN=DigiCert TLS RSA SHA256 2020 CA1 --- No client certificate CA names sent Server Temp Key: ECDH, P-256, 256 bits --- SSL handshake has read 3577 bytes and written 322 bytes --- New, TLSv1/SSLv3, Cipher is ECDHE-RSA-AES128-GCM-SHA256 Server public key is 2048 bit Secure Renegotiation IS supported Compression: NONE Expansion: NONE No ALPN negotiated SSL-Session: Protocol : TLSv1.2 Cipher : ECDHE-RSA-AES128-GCM-SHA256 Session-ID: 89E8830...F95DC6578EBA8EB55CF Session-ID-ctx: Master-Key: FC1DD95F486E85...7B78CCC5B577402079E03813 TLS session ticket lifetime hint: 172800 (seconds) TLS session ticket: 0000 - 53 53 4b 2d 45 30 30 34-35 31 34 32 35 00 00 00 SSK-E00451425... ... 0050 - 9d 31 53 6e 52 8f 5c ba-8f e9 27 ad f0 01 9b e1 .1SnR.\...'..... 0060 - 94 3f 1a 24 e0 77 a8 fb- .?.$.w.. Start Time: 1625171760 Timeout : 7200 (sec) Verify return code: 0 (ok) --- The first couple of lines will show the information about the server certificate, and then he next section in the output lists all the certificates presented by the server in the order in which they were delivered where ror each certificate, the first line shows the subject and the second line shows the issuer information.
The next item in the output is the server certificate.
References
- How To Configure SSH Key-Based Authentication on a Linux Server
- Secure Shell: How Does SSH Work
- Understanding the SSH Encryption and Connection Process
- Public-key cryptography
- SSL Certificates: Serving secure web content over HTTPS
- How To Install an SSL Certificate from a Commercial Certificate Authority
- SSL Handshake and HTTPS Bindings on IIS
- NGINX + HTTPS 101: The Basics & Getting Started
- A Technology Brief on SSL/TLS Traffic
- SSL Offload, SSL Pass-Through and Full SSL Proxy
DevOps
DevOps / Sys Admin Q & A
Linux - system, cmds & shell
- Linux Tips - links, vmstats, rsync
- Linux Tips 2 - ctrl a, curl r, tail -f, umask
- Linux - bash I
- Linux - bash II
- Linux - Uncompressing 7z file
- Linux - sed I (substitution: sed 's///', sed -i)
- Linux - sed II (file spacing, numbering, text conversion and substitution)
- Linux - sed III (selective printing of certain lines, selective definition of certain lines)
- Linux - 7 File types : Regular, Directory, Block file, Character device file, Pipe file, Symbolic link file, and Socket file
- Linux shell programming - introduction
- Linux shell programming - variables and functions (readonly, unset, and functions)
- Linux shell programming - special shell variables
- Linux shell programming : arrays - three different ways of declaring arrays & looping with $*/$@
- Linux shell programming : operations on array
- Linux shell programming : variables & commands substitution
- Linux shell programming : metacharacters & quotes
- Linux shell programming : input/output redirection & here document
- Linux shell programming : loop control - for, while, break, and break n
- Linux shell programming : string
- Linux shell programming : for-loop
- Linux shell programming : if/elif/else/fi
- Linux shell programming : Test
- Managing User Account - useradd, usermod, and userdel
- Linux Secure Shell (SSH) I : key generation, private key and public key
- Linux Secure Shell (SSH) II : ssh-agent & scp
- Linux Secure Shell (SSH) III : SSH Tunnel as Proxy - Dynamic Port Forwarding (SOCKS Proxy)
- Linux Secure Shell (SSH) IV : Local port forwarding (outgoing ssh tunnel)
- Linux Secure Shell (SSH) V : Reverse SSH Tunnel (remote port forwarding / incoming ssh tunnel) /)
- Linux Processes and Signals
- Linux Drivers 1
- tcpdump
- Linux Debugging using gdb
- Embedded Systems Programming I - Introduction
- Embedded Systems Programming II - gcc ARM Toolchain and Simple Code on Ubuntu/Fedora
- LXC (Linux Container) Install and Run
- Linux IPTables
- Hadoop - 1. Setting up on Ubuntu for Single-Node Cluster
- Hadoop - 2. Runing on Ubuntu for Single-Node Cluster
- ownCloud 7 install
- Ubuntu 14.04 guest on Mac OSX host using VirtualBox I
- Ubuntu 14.04 guest on Mac OSX host using VirtualBox II
- Windows 8 guest on Mac OSX host using VirtualBox I
- Ubuntu Package Management System (apt-get vs dpkg)
- RPM Packaging
- How to Make a Self-Signed SSL Certificate
- Linux Q & A
- DevOps / Sys Admin questions
whiteherhatiought.blogspot.com
Source: https://www.bogotobogo.com/DevOps/DevOps-Sys-Admin-Interview-Questions-SSH-Connection-SSL-Certificates.php
Belum ada Komentar untuk "Hipchat Ssl Do You Want to Trust the Host and Continue"
Posting Komentar